Tuesday, November 29, 2016
No room for a tree!
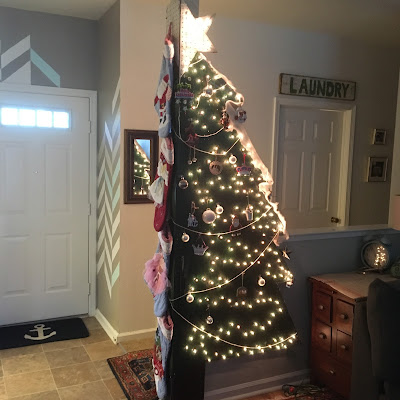
Are you left wondering where a Christmas tree is going to fit in your small space? Today I have an answer for you! Check out my Pegboard Christmas Tree! This idea came to me when I was checking out Natalme on how to paint pegboard. The combination of her tutorial and my desperate need to find a way to deck the halls led me to create this Christmas miracle!
And on the other side of the wall...
If you are low on space but have the holiday cheer let me show you how to create something unique this season!
Step One: The most important thing to do is have yourself a handyman on call AKA your Dad who is visiting! They need projects folks! I just want to help an old man out with feeling useful on vacation! Yes, I am a good daughter, thank you!
Step Two: Go to your local hardware store and purchase two sheets of 8ft x 5ft (I think that is the width) pegboard. If you have a weird wall like myself, you will need to either A: have it be flat from top to bottom or B: buy what I like to call, bumper blocks. These will bump out the wall in order for you to screw the pegboard in and have it look nice.
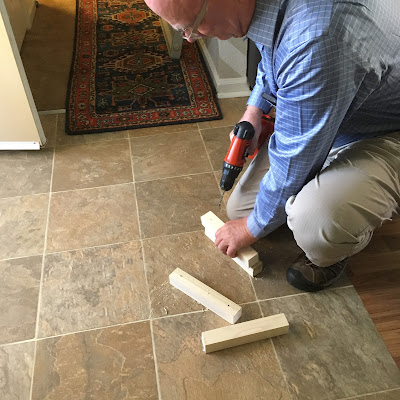
Here is the old man with the bumber blocks. Ours were 1 1/2 in X 4 in. We screwed these into the support wall, three on each side staggered. You will screw the cut boards into the blocks to secure it.
Step Three: You will need to draw out how you want your tree trimmed/cut! I included my star at the top so it was one solid piece. I used the full length of the board 8ft. She is a big one! After you have your tree drawn out, ask your board visitor (Dad) to help cut it out. If he is old you may need to mark in white the stopping points so he doesn't hack your tree to pieces! You can see where I marked the edges.
Step Four: After you repeat step three on your second board and cut out, you are ready to prime. I slapped a little primer down in-between testing out a Costco Pumpkin Pie...it was the right thing to do!
Repeat for each side that will show...and for the testing of pumpkin pie.
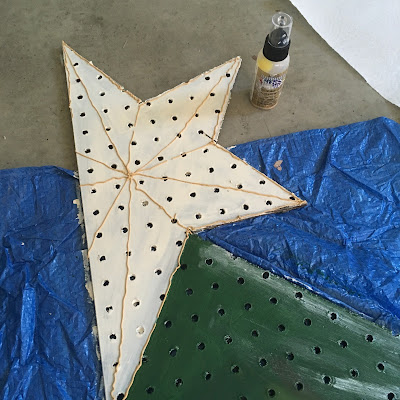
Step Five: Bust out your Decoart Maxx Gloss Chile Poblano paint. It is really a fabulous color! Lay down a coat and make sure you have a tarp underneath. Darn paint will drip down the holes and get everywhere. Yes, I read Natalme but I am to lazy and cheap to go buy the awesome spray painter she said to use. So cheap and lazy use a tarp, smart and on the ball follow Natalme instructions on spray painting!
Step Six: Paint your star white then put a little glitz and glam with Decoart Metallic Pearl on it. I tried out Decoart 3D Opaue Gloss Enamels in Glorious Gold to give the star an outline. As you can see my lines are not the straightest but I don't have the strongest of hands to squeeze the small bottle, so I was shaking...I need to go do some hand exercises!
Finally: you just need to find some lights, stick them in the hole and boom, boom, boom, you are done! I tried to fill the star in the most then draped the lights down the front. All in all I used four strands of 100 lights. I did have to widen the holes a little with a drill to get the base of the light to stay in.
OH DANG! Forgot to say that I cut a 8ft X 7 1/4in strip from the leftovers on one of the boards. This is to cover the end of the wall and to create a great place to hang your stockings! I used Command Hooks to hang the stockings. The hooks just for pegboards sick out to much. I also used the small clear Command Hooks to hang the ornaments.
Happy Holidays!
XOXO
Wednesday, September 28, 2016
Blue Angels #6
When you meet a little boy who was still feeling the loss of a family friend it sticks with you. So when I heard him and my son talking about what he would like me to paint on his wall I thought why not ask Decoart if they would help a girl out with a little paint and a dream. Decoart was happy to give some paint to give this little boy a mural.
Here is what he has posted on his bedroom door.
Chalk is a easy way to get a sketch on the wall and it is easy to wipe off when it isn't working.
Day 1, after the chalk sketch I dove right in! When I start I really don't know how it is going to go so I start with a base layer. I don't like people to watch because they probably get worried in the first hour or two. The first day lasted about 3-4 hours. Mind you I was talking to Zanders mom, Lauren. So it was nice to have someone to talk to but time gets away from me quick!
Day 2, Coming back the next day I had a fresh look at what was going on. I had to tweek a couple spots and paint over places that just didn't look right. I love how the color starts to become smooth and the shading starts to pop! Speaking of shading, the Decoart Maxx Gloss paint line is awesome for shading! I put one color on and come back quickly with another shade and blend with your brush. You do have to move quickly because the paint does dry quickly!
Finishing touches! Once your paint is where you want it you can add your special touches. Here I placed the Blue Angels name and then under the wing I placed US NAVY. I really love how it all turned out. In the end I decided to finish it up with a touch of sky.
This is the final picture as I left today. I was painting for about 6 hours and could feel that urge to keep tweeking even with it being at a point I liked. That usually means I need to eat! I do love this finished look. I am not going to lie, I still want to go back and add a few touches but I don't know if that is OCD or it really needs tweeking. I think I will send my 7 year old over to give me an honest review! If I get more time to go back and tweek, I will post a update!
Wednesday, September 7, 2016
Pumpkin Refresh
Every Fall I drag out my old pumpkins and decorations that are pretty sad looking. This year I thought I would try to incorporate my pumpkins not only in my decorations but as sometihing functional. I have always loved having cloth napkins and placemats available wherever my children sit and eat. This year I thought I would use the pumpkins as my holders but first I had to make them pretty!
I started with these old foam pumpkins I had laying around. I started with measuring the napkins and placemats to see how deep my cuts should be. Using just my kitchen knife I cut out a square in the small pumpkin and a slit in the large pumpkin to slide the placemats in.
My favorite is the small pumpkin with the gold lines!
I used Americana Decor Chalky Finish Vintage and a gold metallic for the stem and design.
Happy Fall!
Faux Shiplap
This has to be my favorite spot in my house! I have been loving shiplap since I first watched "Fixer Upper" and I know I can't be the only one! Knowing that I was unable to put up my own shiplap in a rental I figured I could do the next best thing...paint it! I looked up the measurments for the boards, I went with 8x12.
I started by measuring out on my paint guide 8 inches and marking it. I started at the top of the wall, placing the paint guide to the top of the ceiling and marking at 8 inches. I placed a mark about every 6 inches then I used the paint guide to help with painting a straight line. Once the first line was layed down I used it for a guide measuring, marking then painting. Each line becomes a guide to the next.
I moved from top to bottom just as far as my arms could reach. Once I got the hang of it I moved fast. I completed the small wall in my room in an hour or two.
My bedroom wall was completed after my kitchen walls. In the kitchen it took me much longer due to not knowing what I was doing and taping each line! Yes, I did that and what a mistake! It went by much faster the second time and without tapeing. I used a Crayola kids paint brush the first time and it worked pretty good. The second time I did it I used a 1/4in brush and made sure I didn't have to much paint on it, dragging it on the tip horizontally.
You have to try this! It makes a room so cozy and for a small amount of paint and small portion of your day!
Wednesday, June 15, 2016
Back Jack!
Why hello! We are finally back in the USA after a three year break in Germany. I do miss Deutschland but I am happy to have a fresh new canvas to work on! We have moved into a rather small place so it should be interesting to see how our European furniture will work but that is what storage is for I suppose. As with my previous place I enjoy adding a accent wall to give a little one two punch as guest walk in the door. I try and find a pattern that I can live with for at least a year to three years. I never know what will strike me but once I focus and start looking for inspiration it doesn't take long. I adapt the design as I go. I mess up and then try to make it look like it was on purpose! So if you like uniformity and perfection look away now!
I started off measuring the wall and seeing how many rows I wanted going vertical. I cut out a stencil out of the cardboard box chanty town that was set up in my living room. Once I completed the outline I just went for it. I took the paint that I had purchased for the living room walls and started with the color that would blend into the main wall. Once I completed the main color I went in with the second shade and then with the accent of aqua blue. In total I believe it took me a day and a half. My husband took the kids to the pool so I could focus on finishing it so that helped A LOT!!
By far this project has been my most favorite. The colors, the pattern and how it all came together just speaks to me. What you can do with moving boxes, paint and a little time. Bust it out before the movers come is my motto!
Tuesday, June 14, 2016
Subscribe to:
Comments (Atom)


